x
Showing posts with label photo. Show all posts

Thursday, 25 July 2013

Bokeh-fixing: Opening and cleaning an Olympus OM 50mm f/1.8

In the previous post, I talked about the Olympus OM 50mm f/1.8, and how I find it interesting to use on my Micro Four Thirds camera (Panasonic DMC-GX1), along with some sample shots.

When taking some night shots, with an object close in focus, I could see obvious defects in the bokeh, that is, the round circle of light coming from a distant, out-of-focus, light.

The next image is taken by pointing at a spot light about 200m away, but setting the focus at its closest position (0.45m). This gives a large bokeh:
Spot light is about 200m away, focus set at 0.45m, aperture f/1.8. ISO 1600, 1/40s. The bokeh dimension is about 1000x1000 pixels, that is a little more than a fifth of the width of the image.
Clearly, something is wrong here: there are some black dots and strange reflections on the left side of the bokeh circle.

By looking inside the lens, I can see something that looks like oil drops, apparently not far from the back, maybe behind the outermost lens. I'm wondering if it comes from the aperture mechanism, since it's slow and has obvious oil marks on it, but I can't tell for sure.

I looked up online, and some people on dpreview forums advise that it may not be worth the fuss trying to open it up, and it would be easier to buy a new one, considered the price. On the other hand, it is such a cheap lens (~25USD with shipping) that it would not be a disaster if I broke it. Looking further, I found some diagrams on Olympus Dementia, but even if you can figure out which exact model of lens you have (Olympus made multiple fairly different versions over the years), it still does not tell you how to open it.

Anyway, since my problem looked like to be at the back, and since there are 3 obvious screw there, I decided to start on that side:

It comes out easy. The lever to unlock the lens from the mount falls down (left on the picture below), but it isn't very tricky to find out how to put it back:

Then, a big part of the aperture mechanism comes out easily. This mechanism contains a spring that opens the aperture to the maximum. When the aperture lever is pressed (right of the picture), the spring is extended, and the lens stops down to the desired setting on the aperture ring. I took out the whole thing, taking care of keeping all the elements together. The lever falls out, but it's easy to figure out how to put it in again:

Then I'm left with this, and nothing obvious to remove. I want to remove the metal ring at the top, as it looks like there is oil right behind the glass that it is holding. It is screwed to the bottom part, but hard to remove. I notice some glue near the joint, so I scratch it off with a box cutter:

And after this, I managed to open it up, using a soft cloth to give me more grip and avoid damaging the lens (you can see some scratch on the screw thread, that's where the glue was):

The top glass is now free, and the easiest is to remove it by gravity: invert the lens, hold it in a soft cloth so that the glass does not fall down too hard, and shake it a bit.

No oil on that lens, but, luckily, I could spot it on the lens just below. I did not want to introduce any liquid in the lens, so I removed it the best I could, possibly smudging around instead of properly removing it, actually. A more proper way would have been to find the way to take out that glass, but, well, that would have required significantly more work.

After getting convinced that most of it was removed (or at least evened out...), I reassembled it, and took the same picture. Notice the improvement!
Left: before, Right: after. There is still a slight smudge on the right, but it is noticeably better.
And my 13.5 USD 50mm f/1.8 recovers it's original beautiful bokeh!

Monday, 22 July 2013

Olympus OM 50mm f/1.8 on Micro Four Thirds

One of the strong points of the Micro Four Thirds (MFT) system is that, thanks to its short flange focal distance, you can mount lenses designed for almost any other camera system.

I believe you can get the best deals by buying Olympus OM lenses: There is no current camera supporting those lenses anymore, but they were produced in mass in the 80's and 90's. These are ingredients for a high supply, low demand, therefore low prices on auction websites.

This is especially true of the Olympus OM 50mm, f/1.8, that used to be a kit lens with many film Olympus cameras. Almost a year ago, I bought one on eBay, for 13.50 USD (+ 11 USD shipping). I mounted it on my Panasonic DMC-GX1, using a OM to MFT adapter (less than 10 USD).


I originally bought this lens to use it as part of a custom tilt-shift adapter, but realised that the 50mm focal length is usually too narrow, and purchased a Promaster 28mm f/2.8 for that purpose (OM mount as well).

This lens is really amazing (especially considered its price): It becomes a short telephoto lens on the MFT system (100mm full-frame equivalent), which gives you interesting constraints: you have to focus on details, or put some distance between you and your subject. The large aperture makes it particularly interesting in low-light conditions (museums, night markets, etc.). On the other hand, it does require ND filters in bright daylight, as you are hitting the maximum shutter speed of the camera (1/4000s for the GX1): a 3-stop ND filter, that is ND8 or 0.9 optical density, works perfectly for these situations. I actually never stop the aperture down: I would rather switch to another lens if I want more depth of field.

Focusing is not easy, especially without a viewfinder. MFT cameras provide a magnified view to help you focus, but, with a bit of practice, I'm able to get a reasonably good focus without using that mode, by moving the ring back and forth until I have a good idea of the best position.

The lens I got was in good condition, except for the aperture, that is a bit sluggish: you need to jiggle the aperture ring to get it back to f/1.8 if you stop it down. I could also see some oil on the aperture blades: probably the reason why the mechanism is not working as well as expected. But again, since I only use it at maximum aperture, this is not really a concern for me.

I used that lens for a number of night shots, and realised that the bokeh is not exactly as round and nice as it should be: there is some "dirt" on the left side of the disk (when held in landscape orientation). This does not show up clearly in most shots, but it looks quite silly when the same pattern repeats in different locations on the frame:
Each of the bokeh rings shows some black spots at the bottom: looking through the lens, I can see some oil marks.
The next post will show you how I managed to fix the problem, by opening up the lens.

In the mean time, I uploaded on Flickr a collection of photos taken with that lens:


Wednesday, 19 June 2013

Good morning haze!

Yesterday morning Singapore woke up under thick haze due to forest fires in nearby Sumatra. Not healthy: You can feel it in your throat, and some corridors smell like Scamorza (some delicious Italian smoked cheese).

It smells just like that... (Image from Necrophorus@Wikipedia, GFDL)
Anyway... it gives some "interesting" light when the sun is low.

Good morning purée... (slightly underexposed)


Red sun, still high above the horizon (~1h before sunset).

Wednesday, 24 April 2013

Thunderstorm - Video

The previous post shows you pictures of a thunderstorm, and how to create a composite from the images. This one shows you how to make a video from the images.

Two week-ends ago, a fairly strong thunderstorm struck, with clear views from my window. I mounted my camera on a tripod, and I took close to 1000 shots in about 45 minutes, each with 2 seconds exposure.

The previous post shows you some sample pictures, as well as a composite of many lightnings.

Composite shot, see previous article.
This post will show you how to make a video from these images. Just playing those images at normal video speed (25 frames per second) will not work: because of the 2 seconds exposure I use, lightnings only appear on 1 images, at most 2. Played at 25 fps, each lightning would only appear for 1/25s: barely noticeable.

The idea is therefore to create some burn-in effect, where the bright lightning stay for a number of frames, slowing fading away. The resulting video is below (go to Vimeo for higher resolution):

.

Technique

The first step to create a video is to resize the images to HD format, that is 1080p (1920x1080):
mkdir sm1080
ls *.JPG | xargs -I{} convert -crop 4380x2464+143+67 -resize 1920x1080 -quality 95 {} sm1080/{}
I also do a bit of cropping, as my original framing shows some of the wall next to the window.

We then add the required "burn-in" effect, so that bright light will appear quickly, and slowly fade away. I tried several methods to create this effect, but this very simple method seems to work best:
  1. Get the maximum between the last output frame and the current frame.
  2. Blend this maximum image with the current frame (93% maximum, 7% current): this is your next output frame.
  3. Iterate on the next input frame.
The idea is that a bright lightning will appear immediately, through the maximum operator: if the frame is bright, at step 2, the current frame is the same as the maximum frame, therefore you get 100% of the current frame. For following images, the current frame is less bright, so the brightness decays at a 93% rate. That is, the lightning will disappear almost completely within 29 frames (slightly more than a second). See Wikipedia on exponential decay for more details.

I tried different parameters, 90% made lightnings appear for a too short duration, and 95% led to significant artifacts: 93% seems to be a sweet spot.

This simple Ruby script, that calls ImageMagick, does the job for you:
#!/usr/bin/ruby

list = Dir.new(".").to_a.select{|x| x.match(/.*\.JPG/)}.sort

system("mkdir output")
system("rm output/*")
system("cp #{list[0]} output/#{list[0]}")
list.each_cons(2){|k1, k2|
system("convert output/#{k1} #{k2} -evaluate-sequence max output/max-#{k2}.tiff")
system("composite output/max-#{k2}.tiff #{k2} -blend 93% output/#{k2}")
}
I output the maximum images as TIFF, as to avoid additional JPEG compression artifacts.

It is easy to check out the resulting video with mplayer:
mplayer mf://sm1080/output/*.JPG -mf fps=25:type=jpg
Once you are happy with the results, you can then encode the output (I chose highest quality x264 encoding):
mencoder mf://sm1080/output/*.JPG -mf fps=25:type=jpg -ovc x264 -x264encopts preset=veryslow:tune=film:crf=15:frameref=15:fast_pskip=0:threads=auto -o video.avi
The video can be seen in 720p on Vimeo, and in 1080p on Youtube (unfortunately, Youtube does not let me choose a good thumbnail image, so I switched to Vimeo for this reason).

Sunday, 21 April 2013

Thunderstorm - Composite shot

One of the nice (and sometimes a little scary) things about living under the tropics is those very intense thunderstorms, especially at night.

Composite of an evening thunderstorm.
Last weekend a big one struck, so I mounted my camera (Panasonic DMC-GX1) on the window ledge, using my Gorillapod, and set the kit lens 14-42mm at its widest angle. Luckily, the rain was quite localized, so it wasn't raining much outside my window: no worries about getting my camera wet!

I use the camera in burst mode, more precisely the "H" mode, that allows maximum speed while keeping the maximum resolution. I keep the trigger pressed using my home-made remote trigger. All these shots are taken at f/5.0, with 2 seconds exposure, at ISO 160, slightly underexposed when there is no lightning, but sometimes overexposed for the brightest ones. Only mistake: I should have fixed the white balance, some of the shots clearly use different balances.

The interval between shots is short, around 400ms, meaning that we expose almost all the time, and therefore are able to capture most lightnings. Actually, some lightnings last for a fairly long time, and can be seen over 2 consecutive shots.

In total, I have close to 1000 shots, acquired over 45 minutes. Here are some of the best ones:

2 lightnings next to each other
Intra-cloud lightnings, those are attenuated, probably because the light has to go though clouds and rain.
A bit overexposed, but notice how the sky becomes blue, at night.

The 13 nicest images of the series can be seen in this Picasa album:


I am going to do 2 things with those images: a composite image of all the lightnings, and a video, that I will show in the next post.

Composite

I tried a few different ways to get a nice composite, here is what I think works best:
  1. Select the nicest images, that have a clear lightning in it.
  2. For each of these, take a difference image to the previous one in the series. That is, we want to remove all the background light (man-made light and other background lighting), and only take out the extra light created by the lightning. An image explains it best:
    From top to bottom: 1. Number 226 in sequence, no lightning; 2. Number 227 in sequence, strong lightning; 3. Difference between 227 and 226: all man-made lights have disappeared.
    Obtaining these difference images is straightforward with ImageMagick:
    convert ../P1180226.JPG P1180227.JPG -evaluate-sequence subtract diff/P1180227.JPG
  3. The composition itself is done is Gimp: First, open one of the original images in Gimp, that does not contain a lightning. Then, drag and drop all the differences images in the Layers window.
  4. Hide all these new layers (i.e. until you are back to the original image).
  5. Move one of the difference layer above your original image (start with the brightest lightnings), and show it.
  6. Choose Screen as layer mode. Lighten may also work, but produces results that are not as nice in my opinion.
  7. Go to Colors, then Levels, and increase the input black level until you only see mostly the lightning, without too much increase in the background light in the sky. You can also change the input white level if you want the lightning to appear brighter.
  8. Repeat from step 5.
This shows you the progression of the composition, starting from the original image, step 0:
Montage of the progression of the composite image. One image is added at each step (2 images from 3 to 5).
For step 1, the black level is not increased significantly, so as to get the blue sky on the right.
The image at step 12 is the one shown at the beginning of this post, after slight color adjustments.

If you like my posts, you can now follow me on Google Plus, Twitter, or via RSS, thanks!

Tuesday, 9 April 2013

Macro video - Correcting chromatic aberration, white balance, and soundtrack

This post is about taking macro videos, that is, videos of small objects, at relatively high magnification. In other posts, you can find a general introduction on taking macro pictures using a close-up filter, and how to correct chromatic aberration.
The previous post shows how to force the lens aperture on the DMC-GX1, this post gives technical details to correct chromatic aberration, white balance, and improve the soundtrack.

As mentioned in the previous post, the Panasonic DMC-GX1 is severely limited when it comes to video mode: it does not allow manual setting of the aperture and white balance.

Once we managed to trick the lens to force a slow aperture, we get this this not-so-nice video, with chromatic aberration (red/blue fringes in the corner of the images), incorrect white balance (the music box looks too white), and noisy soundtrack:

With a few operations, we'll show how to turn it into this nicer looking one:


Thursday, 4 April 2013

Macro video

This post is about taking macro videos, that is, videos of small objects, at relatively high magnification. In other posts, you can find a general introduction on taking macro pictures using a close-up filter, and how to correct chromatic aberration.

This post will show you how to take videos of small objects. I used my Reuge music box as an example, since it is small, and it moves (playing some nice music in the process, of course)... The final result is shown here:


My camera, the Panasonic DMC-GX1, is in the medium range of what Panasonic offers, which, unfortunately, means that there is no manual control of aperture or white balance in video mode. There is no technical reasons for that, only commercial ones, and, well, that's a shame: there is enough feature differentiation between the DMC-GH2/GH3 and the GX1 without adding artificial limitations.

Monday, 18 March 2013

Macro photography on the cheap - Correcting chromatic aberration

In this series I show how you can use a cheap close-up filter to take macro pictures. The previous post is a general introduction, and this post will show you how to fix chromatic aberration introduced by the filter.

As shown in the previous post, the cheap 8x close-up filter introduces a lot of chromatic aberration (CA), especially at high magnification (45-150mm lens at maximum focal length). This is obvious when taking a picture of a black and white checkered pattern.
Checkered pattern (1mm square size), uncorrected.
Can we fix this? After all, the Micro 4/3 is known to fix lens distortion and CA in software. The idea is that Panasonic could manufacture optically inferior lenses, with fewer elements, hence cheaper/lighter, and fix some of the image imperfection in software. Since there is no viewfinder, the user would never notice these corrections.

Here, I'm pushing this to the limit: adding a very cheap close-up adapter, that introduces a lot of CA, and seeing how we can recover a decent-looking image.

Tuesday, 12 March 2013

Macro photography on the cheap

In this series I will show how you can use a cheap close-up filter to take macro pictures. This post is a general introduction, and the next post will show you how to fix chromatic aberration introduced by the filter.

There are many ways of obtaining relatively large magnification with a camera. You can find out about many of these methods on the excellent Micro 4/3rds Photography blog: using a dedicated macro lens, extension rings, a reverser ring, or a close-up filter...

I'm not willing to spend more than 500$ for a dedicated macro lens, so I went the cheapest possible way: using a 8x close-up filter, that you can find for 8$ on dealextreme, and maybe cheaper on eBay. I went for the 8x filter instead of the 10x, because the latter has bad reviews: the lens element protrudes at the back of the filter, and you risk scratching your lens when mounting the filter (Fredrik Gløckner talks about it in this post); it also seems to be optically inferior.

Wednesday, 20 February 2013

Triggering Panasonic Lumix from Arduino

As mentioned in the post about how to build a remote trigger, we can also use an electronic device, such as an Arduino, to trigger the camera.

There are several way of accomplishing this, a simple MOSFET may do the trick, but I decided to use a optocoupler. The optocoupler electrically separates the Arduino and camera circuitry: This decreases risks of damaging the camera because of incorrect wirings on the Arduino side.

Camera detection circuit

If you remember from this post, the triggering mechanism for Panasonic cameras is a little unusual: The resistance across 2 pins defines the trigger status: around 41.1kOhm at rest, 5.1kOhm to pre-focus the camera, 2.2kOhm to trigger a shot.

Understanding a bit more of the detection circuit inside the camera is useful here. This can be done by measuring the voltage across the 2 pins in different combinations:

State Measured resistance Voltage measured
Open circuit (infinite) 3.08V
Trigger present ~41.4 kOhm 2.49V
Focus ~5.0 kOhm 1.05V
Trigger ~2.1 kOhm 0.56V

We can make an educated guess on the detection circuit used by the camera, making use of a simple voltage divider, and reading out the voltage drop on the remote trigger.
Possible detection circuit on the camera (the camera resistor may be connected on the ground side, and may be more complicated to avoid the need for an analog to digital converter)
Obtaining Vcamera is straightforward: it is the open circuit voltage. We can guess Rcamera entering resistances Rtrigger and Vdetect in the following equation:
Moving terms around, we get:
For the 3 values above, we get, respectively, Rcamera = 9.8, 9.7 and 9.45 kOhm. So we have a resistor around 9.5 kOhm on the camera side.

Triggering circuit 

Now comes the triggering circuit itself, as shown in the next figure.

Triggering circuit (optocoupler drawing from Wikipedia).
Note: The polarity of the camera connector is important: if you reverse the pins, no current can flow through the the optocoupler (no damage to the camera, it just won't work).
In my case, Rled = 200 Ohm, Rp = 36 kOhm, Rt = 0

The optocoupler provides a separation between the Arduino circuit on the right, and the camera on the left. When Pin 2 on the Arduino is grounded, no current flows through the LED, and the transistor on the right is in the "off" state, i.e. it does not let any current through. When a voltage is applied to Pin 2 (digital 1 = 5V), the led shines on the transistor, allowing current through it ("on" state).

In this case I used a TLP627 optocoupler. The easiest parameter to compute is Rled: As indicated in the datasheet, the forward voltage of the LED is 1.15V, and we want a maximum of 25mA. A simple calculation (or an online tool) will tell you that a 200 Ohm resistor is required.

What we want here is the circuit to have a 44kOhm resistance (~2.5V) in the rest state, and drop the resistance to 2 kOhm (~0.5V) when the optocoupler is on. A simple solution would be to set Rp to 42 kOhm, and Rt to 2.1 kOhm. When the optocoupler is off, the total resistance is 44 kOhm, when it is on, the optocoupler shorts Rp, and the total becomes 2.1 kOhm.

If you try this combination, you will realise that it is not enough to trigger the camera: the voltage drops, but only enough to pre-focus the camera, that is a voltage around 1 V.

What is happening? In reality, the optocoupler is not an ideal switch: in the "on" state, it has a small, but finite, voltage drop. In my case, this voltage drop is around 0.5 V, just what we need to trigger the camera. Therefore, we can get rid of Rt, and simply set Rp to 44 kOhm. I did not have a 44 kOhm resistor, but I realised that 36 kOhm also works, so I used that.

I'm not 100% sure of the theory behind, but I suspect that the transistor can only conduct current when it is close to its saturation voltage. However, for the TLP627, the saturation voltage is anywhere between 0.3 to 1.2V, according to the datasheet. Therefore, you may need to adjust Rp depending on the individual properties of your optocoupler, or you may not be able to trigger the camera at all.

These guys use a LTV-355T optocoupler, with Rp=1 kOhm. I'm not sure what makes that optocoupler better, if it is better. I did not use it because it is only available as a surface mount component, while the TLP627 is available as 4DIP package, compatible with breadboards and stripboards.

If there is an electrical engineer in the room, maybe that person can shed some light on this. I stopped thinking about it, because the circuit works, and that is all I need ,-)

Finished circuit on a breadboard, connected to a Freeduino (Arduino clone).

Arduino sample code

The following code will trigger the Arduino every 10 seconds. This is useful for simple time-lapse photography:
int trigger = 2;
int led = 13;

int time = 10; /* time between shots, in seconds */

void setup()  {
  Serial.begin(9600);
  analogReference(INTERNAL);
  pinMode(trigger, OUTPUT);
  pinMode(led, OUTPUT);
  digitalWrite(trigger, LOW);
}

void loop()  {
  for (int i = time-1; i > 0; i--) {
    delay(1000);
  }
  delay(900);
  digitalWrite(trigger, HIGH);
  digitalWrite(led, HIGH);
  delay(100);
  digitalWrite(trigger, LOW);
  digitalWrite(led, LOW);
}
This code "holds down" the shutter for 100 milliseconds, enough to allow the camera to autofocus. It also blinks the Arduino LED on pin 13, to give you a visual feedback that the code is running, in case the camera does not trigger (wrong polarity, etc.).

Tuesday, 12 February 2013

Tilt adapter for Micro Four Third - Part 3 - Simple adapter

This is the third part of the series on a tilt adapter for Micro Four Third system. Please read the introduction first, and the lens selection guide.

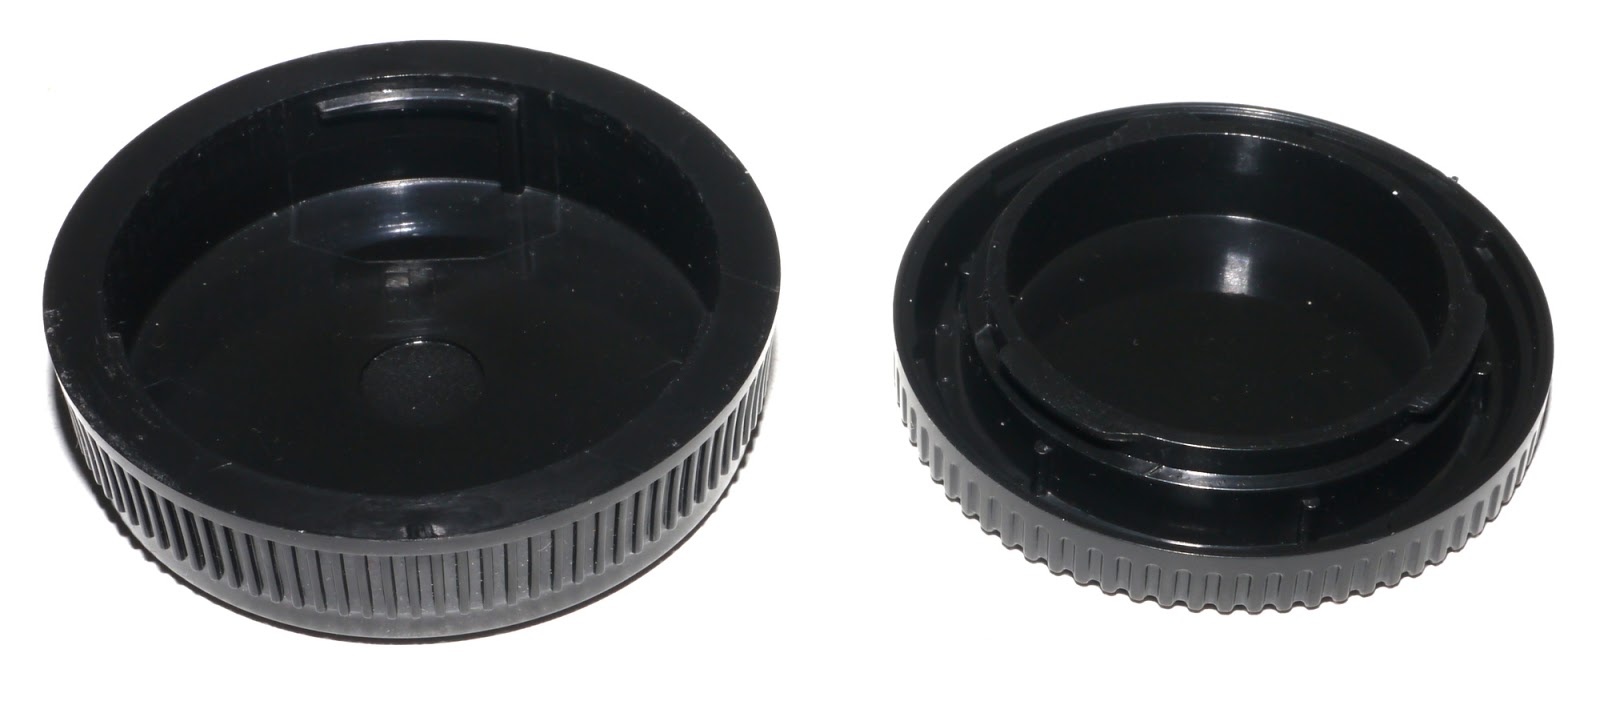
This article will show you how to build a very simple DIY tilt adapter using a body cap, a lens cap, and some plastic bag.

Make the adapter

You will need the following items:
  • A lens (read the lens selection guide, you can find a suitable Olympus OM lens on eBay for 20-30 USD)
  • Micro Four Third body cap (<3$ on eBay)
  • Lens cap (<2$ on eBay). For Olympus OM lenses, a Four Third cap (not Micro Four Third!) also works (the mount is very similar).
  • Opaque plastic bag (thick but flexible plastic is best)
  • (Optional) Some black paper
Left: Olympus OM lens cap. Right: Micro Four Third body cap


Thursday, 7 February 2013

Tilt adapter for Micro Four Third - Part 2 - Lens selection

This is the second part of the series on a tilt adapter for Micro Four Third system. Please read the introduction first. The next article shows you how to build a simple adapter.

The first thing you need is to find a suitable lens. If you read the plungercam tutorial, you need to check 2 things: the flange focal distance, and the image sensor/film size.

Flange focal distance

The flange focal distance tells you the distance between the lens mount and the image sensor. For tilt-shift, you want to be able to move the lens around without hitting the camera, therefore, you need a lens with a flange focal distance larger than the one of the camera.

Flange range on a DSLR (top), versus mirror-less camera (bottom).
Drawn by Shigeru23 on Wikipedia (CC BY-SA 3.0).

Monday, 4 February 2013

Tilt adapter for Micro Four Third - Part 1 - Introduction

This post is an introduction to the topic. See the next article for some advise on lens selection, and the following one for instructions to build a simple adapter.

Tilt-shift pictures are getting quite popular nowadays, especially the tilt effect that gives a miniature effect to pictures. This is especially beautiful in videos, an example is shown below.


Tuesday, 29 January 2013

Pinwide "lens" - or real life Instagram

I recently bought the pinwide cap for my micro 4/3 camera (Panasonic DMC-GX1). Sure, you can also make a pinhole by making a hole in a camera camera cap, but this one is "optimised", with the pinhole receding inside the camera body to get an image as wide as possible.

The adapter is made of good quality plastic (polycarbonate "char siew" according to DigitalRevTV), and comes in a nice little metal box.

Pinwide in its box

Sunday, 16 December 2012

Simple remote trigger for Panasonic Lumix

In this post I show how to build a simple remote trigger for a Panasonic camera (Lumix DMC-GX1).

A remote trigger is a cable, connected to the camera on one side, with with a button on the other side. The button allows you to take pictures without touching the body of the camera. This is especially useful at night, when taking pictures with a tripod: pressing the camera trigger will invariably shake the camera, leading to blurry pictures. Also, having a remote interface is interesting to automate picture taking (triggering from a laser sensor, timelapse, motion sensor, etc...), but more on that in future posts.

The "official" Panasonic remote trigger is fairly expensive (~50 USD). You can find much cheaper alternatives on ebay, but, isn't more fun to build it yourself?

The design I choose here consists of 2 parts: a cable, and a stripboard. The cable has a 2.5mm jack on one side, that will fit into the camera connector, and a simple 2-pin header on the other side, that is connected to the stripboard. The stripboard has 2 buttons: One allows to pre-focus (identical to a half-press of the camera trigger button), while the other triggers the camera to take a picture (full-press).

The completed remote trigger.

Monday, 10 December 2012

Playing Galileo

Galileo first observed 4 moons of Jupiter in 1609, using his telescope. There was some sort of controversy at the time, and Simon Marius may have discovered them at the same time, or, more probably, slightly later. Anyway, Marius still got to name the moons, according to 4 lovers of Zeus: Io, Europa, Ganymede, and Callisto. For those who did not have the privilege of learning Greek mythology in school, Zeus is a Greek god (actually, the father of gods), and Jupiter is its equivalent in the Roman religion. Zeus had countless lovers (and children), but Europa seems to have quite a successful career as namesake, since she also gave her name to a continent. Not bad, huh?

Back to the topic...

These 4 moons can easily be seen with a pair of binoculars. Actually, they could even be seen with the naked eye, were it not for their close proximity to the bright Jupiter. Anyway, the other night, I saw a bright spot in the sky, figured out, using Stellarium, that it was the planet, and started wondering if I could take pictures of it, with its 4 largest moons.